back to blogs

How to Build a Simple Pokémon Randomizer App with Kotlin Android
March 22, 2025
INTRODUCTION
Hi guys, in this brief tutorial I want to show y'all things I've learned when I did a Udemy Course on Android Development, particularly on how we would fetch an API request from an API such as the Pokemon API (https://pokeapi.co/), because who doesn't love Pokemon, right?
We will build a simple Pokemon randomizer that shows the Pokemon stats such as its height, weight, sprites, and more. On top of that, we will also show a list of Pokemon available from the API in the form of a Lazy Column.
Before we jump right into coding, I want to mention the tools that we are going to use in order to help us build the project:
- Android Studio (Meerkat | 2024.3.1)
- Kotlin
- Jetpack Compose
- Retrofit (for API calls)
PROJECT SETUP
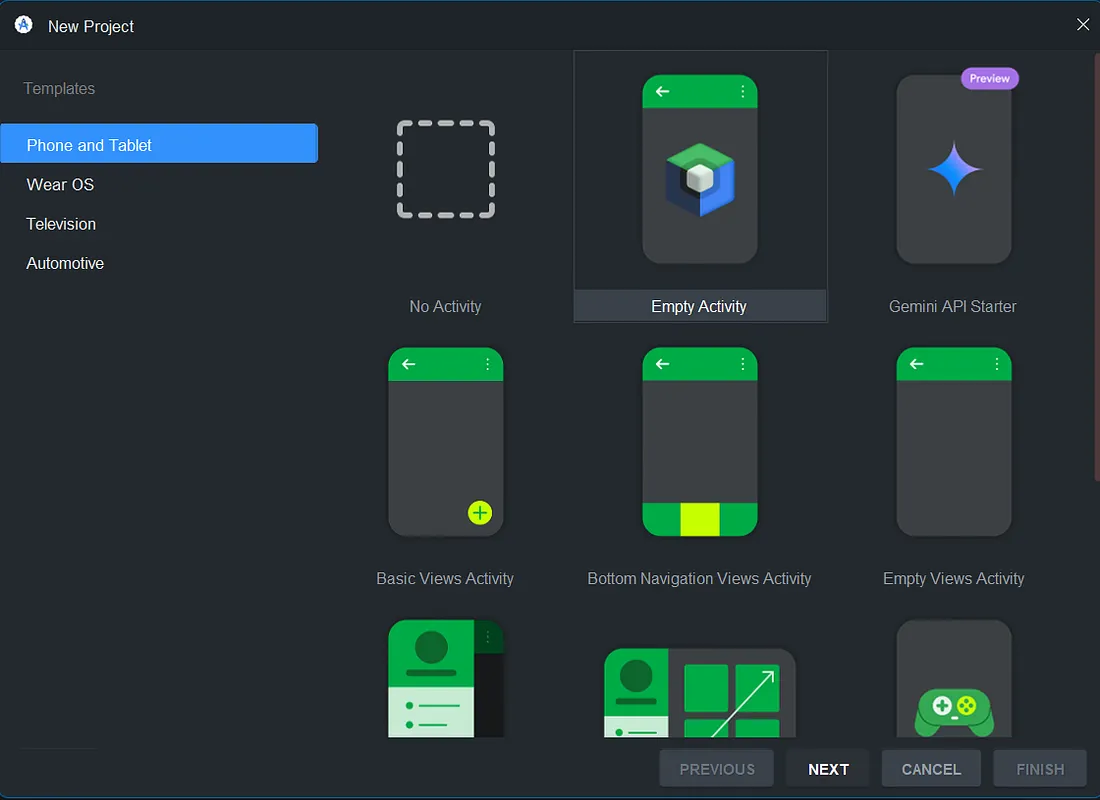
First off, open up Android Studio and create a new project. We will be using an Empty Activity template for our project.
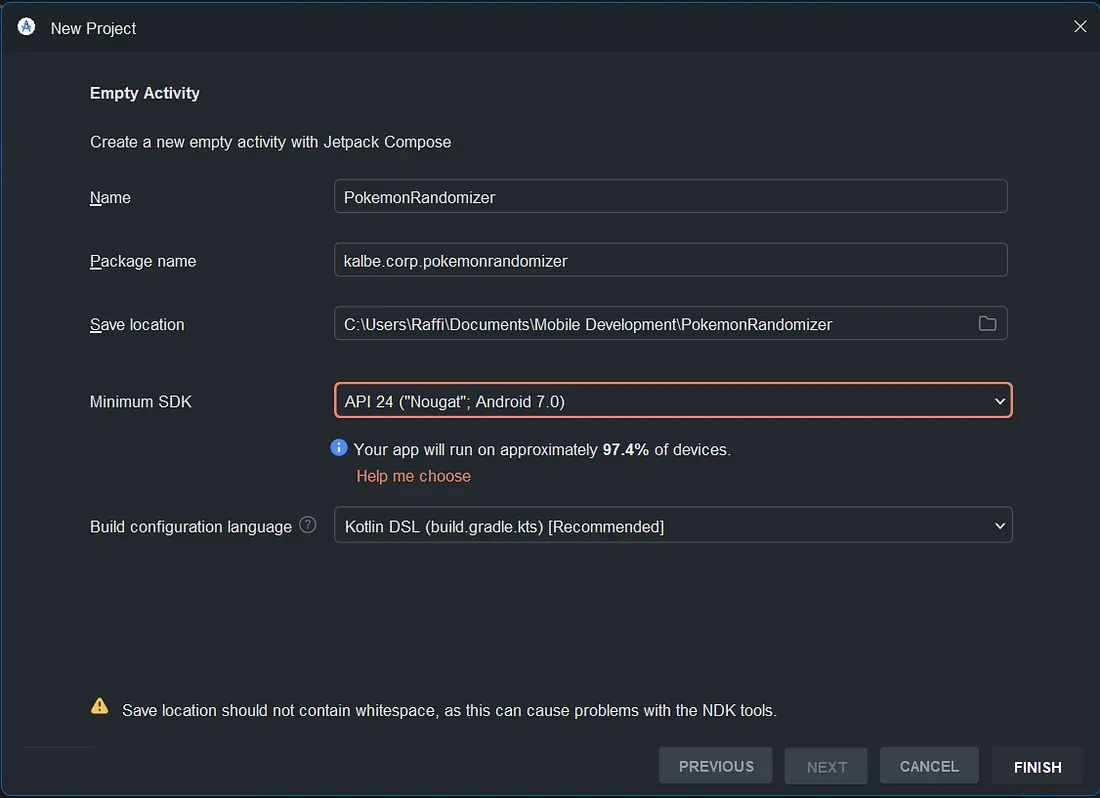
Name your project to whatever you want, or you can just copy mine. For the package name, minimum SDK & build configuration should be fine the way it is, but for the save location, you can adjust it to your desire file location.
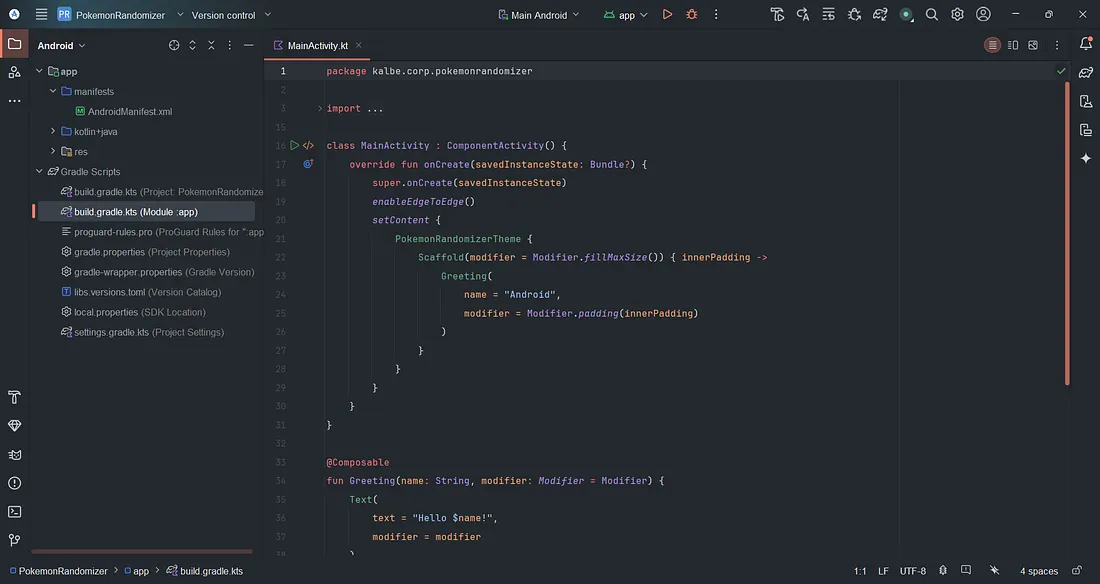
Now, wait for the project to build up everything it needs, once its done, you can open the build.gradle file from the App.
We will be setting up our dependencies that we need for our project such as Retrofit for our API calls, ViewModel for our data communication between the UI and data, coil to efficiently load our sprite images & Gson for converting JSON file.
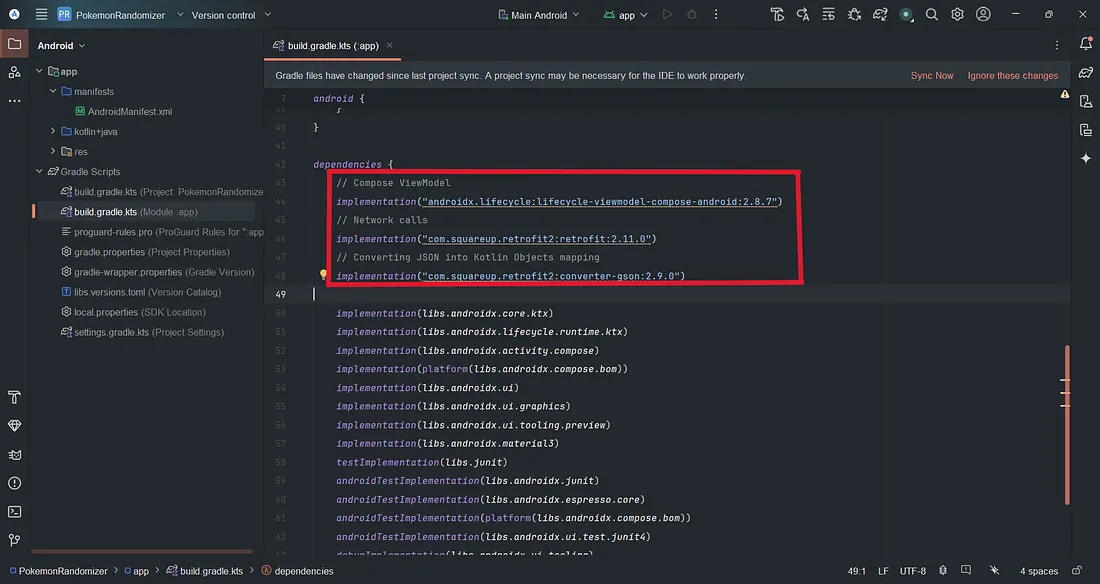
Copy and paste this code in our build.gradle dependencies block, you can place it anywhere you want or you can just copy mine which is above all the default dependencies.
implementation("androidx.lifecycle:lifecycle-viewmodel-compose-android:2.8.7")
implementation("com.squareup.retrofit2:retrofit:2.11.0")
implementation("com.squareup.retrofit2:converter-gson:2.9.0")
implementation("io.coil-kt:coil-compose:2.7.0")
DESIGNING THE UI WITH JETPACK COMPOSE
Before we start calling our API to fetch the Pokemon data, we will be designing our simple UI first with Jetpack Compose.
First, create a new Kotlin file PokemonScreen and place this code
@Composable
fun PokemonScreen(){
    Column(
        modifier = Modifier
            .fillMaxSize()
            .padding(16.dp),
        verticalArrangement = Arrangement.Center,
        horizontalAlignment = Alignment.CenterHorizontally,
    ) {
        Box{
            // TODO Display Randomized Pokemon
        }
        Box{
            // TODO Display Pokemon Grid
        }
    }
}
Next, we will design our Randomized Pokemon, copy this code and place it to the RandomizedPokemonScreen composable.
@Composable
fun RandomizedPokemonScreen(
    singlePokemon: SinglePokemonResponse,
    onRandomizeClick: () -> Unit,
){
    Box(
        modifier = Modifier
            .wrapContentSize(Alignment.Center),
    ) {
        Column(
            verticalArrangement = Arrangement.Center,
            horizontalAlignment = Alignment.CenterHorizontally,
        ) {

            // TODO Add Pokemon Sprite here

            Text(text = "Randomized Pokemon", fontSize = 20.sp, fontWeight = FontWeight.Bold)
            Spacer(modifier = Modifier.height(8.dp))
            Text(text = "ID: ${singlePokemon.id}")
            Spacer(modifier = Modifier.height(8.dp))
            Text(text = "Name: ${singlePokemon.name.capitalize()}")
            Spacer(modifier = Modifier.height(8.dp))
            Text(text = "Height: ${singlePokemon.height}")
            Spacer(modifier = Modifier.height(8.dp))
            Text(text = "Weight: ${singlePokemon.weight}")
            Spacer(modifier = Modifier.height(24.dp))
            Button(onClick = {onRandomizeClick()}) { Text("Randomize") }
        }
    }
}
You will notice some errors that will occur with this code and the next, but no worries, we will be fixing them soon, just be patience :)
For now, lets continue designing our UI layout with Jetpack Compose. Create a new composable function within the PokemonScreen file name PokemonListScreen and place this code
@Composable
fun PokemonListScreen(pokemonLists: List, pokemonViewModel: MainViewModel){
    Row {
        LazyVerticalGrid(GridCells.Fixed(2), modifier = Modifier.fillMaxSize()){
            items(pokemonLists){
                    pokemon ->
                val id = pokemon.url.trimEnd('/').split("/").last().toIntOrNull() ?: 0
                pokemonViewModel.getPokemonSprites(id)
                    ?.let { PokemonItem(pokemon = pokemon, sprites = it) }
            }
        }
    }
}
This will display our Pokemon List fetched from the API in the form of a LazyVerticalGrid.
Lastly, place this code below the PokemonListScreen function, this will represent our Pokemon List data per item.
@Composable
fun PokemonItem(pokemon: Pokemon, sprites: Sprites){
    Column(
        modifier = Modifier
            .padding(16.dp)
            .clip(RoundedCornerShape(8.dp))
            .background(Color.Yellow)
            .fillMaxSize(),
        horizontalAlignment = Alignment.CenterHorizontally,
    ) {
        // TODO Add Pokemon Sprite here

        Text(
            text = pokemon.name.capitalize(),
            color = Color.Black,
            style = TextStyle(fontWeight = FontWeight.Bold),
            modifier = Modifier.padding(bottom = 16.dp)
        )
    }
}
Now that our UI design is done, we will start to fetch data from the PokéAPI to display our Pokemon to the screen.
FETCHING POKEMON DATA FROM THE API
PokéAPI is a free and open RESTful API that provides data from the Pokémon universe, including details about Pokémon, abilities, moves, types, items, and more. It is widely used by developers for building Pokémon-related applications. For more information, you can check the documentation from the website https://pokeapi.co/
In our app, we will be fetching Pokémon data related to its id, sprite, name, height & weight. Create a new file PokemonApiService and place this code inside of it, this is where will we be utilizing the Retrofit dependency for our API calls.
const val BASE_URL = "https://pokeapi.co/api/v2/"
const val LIMIT = 20

private val retrofit = Retrofit.Builder().baseUrl(BASE_URL)
    .addConverterFactory(GsonConverterFactory.create())
    .build()

val pokemonService: PokemonApiService = retrofit.create(PokemonApiService::class.java)

interface PokemonApiService{
    @GET("pokemon?limit=$LIMIT/")
    suspend fun getPokemonLists() : PokemonResponse

    @GET("pokemon/{id}/")
    suspend fun getSinglePokemon(
        @Path("id") id: Int
    ) : SinglePokemonResponse
}
If you notice, we are limiting our fetched Pokemon data by 20, you can try adjusting this limit to your liking but beware that it could significantly affect our app performance as we will not be implementing a pagination to fix that it.
HANDLING API RESPONSES
Now, you may notice some errors that is occurring, we will fix that by creating a new file called Pokemon, this will be where we create our data class to store our Pokemon data and responses. Copy and paste this code below
data class Pokemon(
    val name: String,
    val url: String,
)

data class PokemonResponse(
    @SerializedName("results") val pokemonLists: List? = emptyList()
)

data class SinglePokemonResponse(
    val id: Int,
    val name: String,
    val height: Int,
    val weight: Int,
    val sprites: Sprites,
)
The Pokemon data class represents the JSON format that is presented within the API, it is important that the data matches the actual JSON format from the API, you can examine the JSON format by placing the API call https://pokeapi.co/api/v2/pokemon/ in your browser
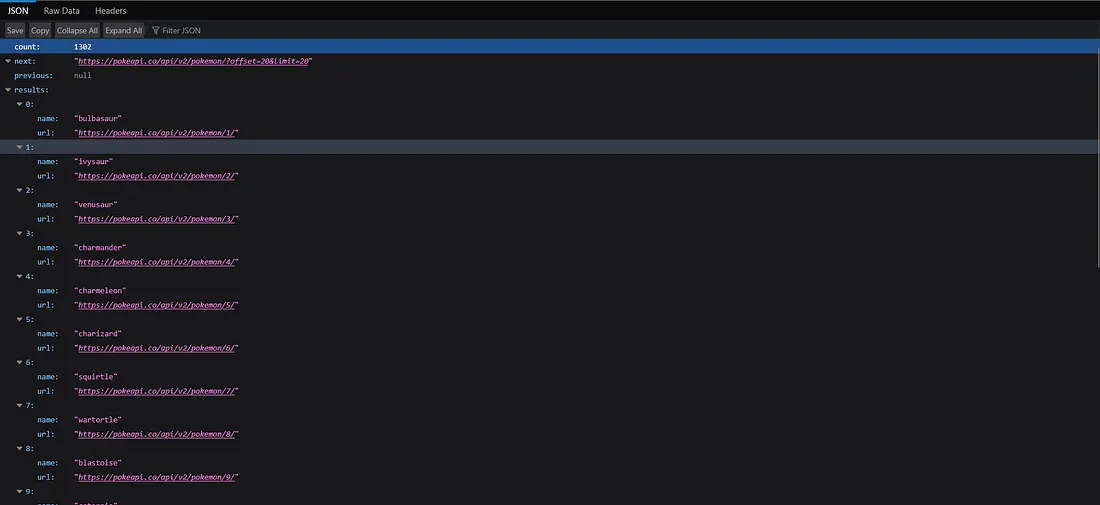
As you can see, the API has an object called results which contains a list of all the Pokemon that we can display in our app. Those Pokemon are differentiated by indexes from 0, so if we want to call and fetch data from the API for a specific Pokemon, we can specify the index we want, lets say we want to access index 0, lets place this API call to the browser now https://pokeapi.co/api/v2/pokemon/0
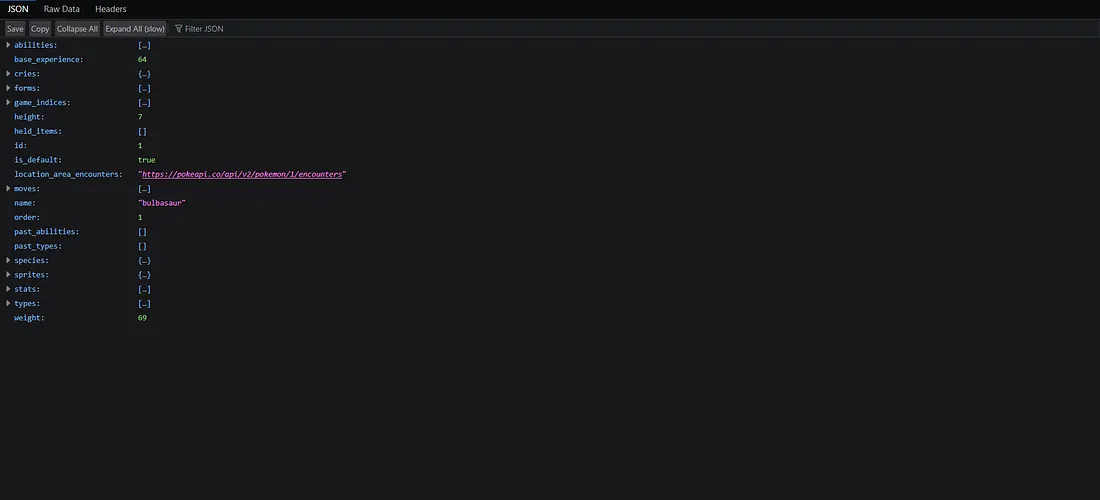
We now have the data for Bulbasaur such as its height, weight, moves, name, sprites, and more from that API call. These are the data that we will be needing in order to display it in our app.
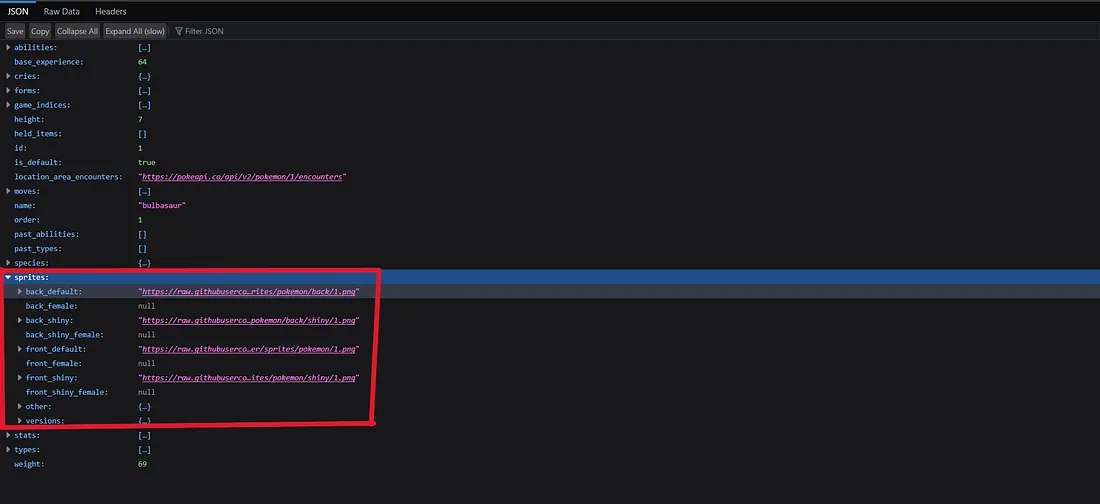
Next, we will be creating a new data class in our Pokemon file called Sprite
data class Sprites(
    val back_default: String,
    val back_shiny: String,
    val front_default: String,
    val front_shiny: String,
)
Because, if you notice, within the specific Pokemon API call, there is a sprite that has several objects representing different sprites. To make it easier, we will also create that Sprite object in our project to represent different the different sprites.
Now that our data classes are done, we can create our ViewModel to dynamically store and update the data using the MVVM architecture. Create a new file called MainViewModel and place this code below
class MainViewModel : ViewModel() {
  private val _pokemonListsState = mutableStateOf(PokemonListsState())
  private val _singlePokemonState = mutableStateOf(SinglePokemonState())
  private val _pokemonSprites = mutableStateOf>(emptyMap())
  val pokemonListsState: State = _pokemonListsState
  val singlePokemonState: State = _singlePokemonState

  init {
      fetchPokemonLists()
      fetchSinglePokemon(1)
  }

  private fun fetchPokemonLists() {
      viewModelScope.launch {
          try {
              val response = pokemonService.getPokemonLists()
              val pokemonList = response.pokemonLists ?: emptyList()

              _pokemonListsState.value = _pokemonListsState.value.copy(
                  pokemonLists = pokemonList,
                  loading = false,
                  error = null,
              )

              fetchPokemonSprites(pokemonList)
          } catch (e: Exception) {
              _pokemonListsState.value = _pokemonListsState.value.copy(
                  loading = false,
                  error = "ERROR FETCHING POKEMON: ${e.message}"
              )
              Log.e("ERROR", _pokemonListsState.value.error ?: "Unknown error")
          }
      }
  }

  private fun fetchPokemonSprites(pokemonList: List) {
      viewModelScope.launch {
          val spriteMap = mutableMapOf()

          pokemonList.forEach { pokemon ->
              val id = pokemon.url.trimEnd('/').split("/").last().toIntOrNull()
              if (id != null) {
                  try {
                      val response = pokemonService.getSinglePokemon(id)
                      spriteMap[id] = response.sprites
                  } catch (e: Exception) {
                      Log.e("ERROR", "Failed to fetch sprite for Pokemon ID: $id")
                  }
              }
          }

          _pokemonSprites.value = spriteMap
      }
  }

  private fun fetchSinglePokemon(id: Int) {
      viewModelScope.launch {
          try {
              val response = pokemonService.getSinglePokemon(id)
              _singlePokemonState.value = _singlePokemonState.value.copy(
                  pokemon = response,
                  loading = false,
                  error = null,
              )
          } catch (e: Exception) {
              _singlePokemonState.value = _singlePokemonState.value.copy(
                  loading = false,
                  error = "ERROR FETCHING POKEMON: ${e.message}"
              )
              Log.e("ERROR", _singlePokemonState.value.error ?: "Unknown error")
          }
      }
  }

  fun getPokemonSprites(id: Int): Sprites? {
      return _pokemonSprites.value[id]
  }

  fun randomizePokemon() {
      val randomId = (1..151).random()
      fetchSinglePokemon(randomId)
  }

  data class PokemonListsState(
      val loading: Boolean = true,
      val pokemonLists: List = emptyList(),
      val error: String? = null,
  )

  data class SinglePokemonState(
      val loading: Boolean = true,
      val pokemon: SinglePokemonResponse? = null,
      val error: String? = null,
  )
}
In this file, we will also handle the randomizing logic for every time the user click the Random Button in our app. We're basically randomizing the index that will be shown to specify a specific Pokemon based on the index by modifying the endpoint in our PokemonApiService when we are trying to fetch a single Pokemon.
That's it, now that our ViewModel is done, we can continue displaying the Pokemon information to the screen based on the UI we have created previously.
DISPLAYING POKEMON INFORMATION
We will first load the sprite image for the Pokemon using the AsyncImage composable from the dependency Coil. Try to copy this code below and add it to our PokemonScreen , specifically in our RandomizedPokemonScreen composable function
AsyncImage(
  model = singlePokemon.sprites.front_default,
  contentDescription = "pokemon sprite",
  modifier = Modifier.aspectRatio(2f)
)
Now, our code in the RandomizedPokemonScreen should be something like this
@Composable
fun RandomizedPokemonScreen(
    singlePokemon: SinglePokemonResponse,
    onRandomizeClick: () -> Unit,
){
    Box(
        modifier = Modifier
            .wrapContentSize(Alignment.Center),
    ) {
        Column(
            verticalArrangement = Arrangement.Center,
            horizontalAlignment = Alignment.CenterHorizontally,
        ) {
            AsyncImage(
                model = singlePokemon.sprites.front_default,
                contentDescription = "pokemon sprite",
                modifier = Modifier.aspectRatio(2f)
            )

            Text(text = "Randomized Pokemon", fontSize = 20.sp, fontWeight = FontWeight.Bold)
            Spacer(modifier = Modifier.height(8.dp))
            Text(text = "ID: ${singlePokemon.id}")
            Spacer(modifier = Modifier.height(8.dp))
            Text(text = "Name: ${singlePokemon.name.capitalize()}")
            Spacer(modifier = Modifier.height(8.dp))
            Text(text = "Height: ${singlePokemon.height}")
            Spacer(modifier = Modifier.height(8.dp))
            Text(text = "Weight: ${singlePokemon.weight}")
            Spacer(modifier = Modifier.height(24.dp))
            Button(onClick = {onRandomizeClick()}) { Text("Randomize") }
        }
    }
}
If you notice, the errors that occurs previously has been solved because we have created the data classes for the Pokemon data and responses. Similarly, we will be also adding an AsyncImage inside the PokemonItem composable function, now the code will be looking like this
@Composable
fun PokemonItem(pokemon: Pokemon, sprites: Sprites) {
    Column(
        modifier = Modifier
            .padding(16.dp)
            .clip(RoundedCornerShape(8.dp))
            .background(Color.Yellow)
            .fillMaxSize(),
        horizontalAlignment = Alignment.CenterHorizontally,
    ) {
        AsyncImage(
            model = sprites.front_default,
            contentDescription = "pokemon sprite",
            modifier = Modifier.aspectRatio(2f)
        )

        Text(
            text = pokemon.name.capitalize(),
            color = Color.Black,
            style = TextStyle(fontWeight = FontWeight.Bold),
            modifier = Modifier.padding(bottom = 16.dp)
        )
    }
}
Back to our PokemonScreen composable function, we will be putting some code to our TODO's comments, but first, copy and paste this code in the beginning of the composable function
  val pokemonViewModel: MainViewModel = viewModel()
  val viewState by pokemonViewModel.pokemonListsState
  val pokemonViewState by pokemonViewModel.singlePokemonState
For the first Box, which is responsible for displaying the Randomized Pokemon, remove the TODO comment then copy and place this code below
when {
  pokemonViewState.loading -> {
      CircularProgressIndicator(modifier = Modifier.align(Alignment.Center))
  }

  pokemonViewState.error != null -> {
      Text("ERROR OCCURRED!", modifier = Modifier.align(Alignment.Center))
  }

  else -> {
      pokemonViewState.pokemon?.let {
          RandomizedPokemonScreen(
              singlePokemon = it,
              onRandomizeClick = { pokemonViewModel.randomizePokemon() })
      }
  }
}
Notice that the pokemonViewState is dictating the display information that is being shown on the screen, if the state is loading, then it'll show the CircularProgressIndicator, when its in state error, it'll show the "ERROR OCCURRED!" text. But, if all went well, then it'll show the randomized Pokemon to the screen.
Now, for the second box, which is the Pokemon grid, remove the TODO comment and place this code below
when {
  viewState.loading -> {
      CircularProgressIndicator(modifier = Modifier.align(Alignment.Center))
  }

  viewState.error != null -> {
      Text("ERROR OCCURRED!", modifier = Modifier.align(Alignment.Center))
  }

  else -> {
      Column(
          verticalArrangement = Arrangement.Center,
          horizontalAlignment = Alignment.CenterHorizontally
      ) {
          Spacer(modifier = Modifier.height(16.dp))
          PokemonListScreen(pokemonLists = viewState.pokemonLists, pokemonViewModel)
      }
  }
}
Now our code should be looking something like this
@Composable
fun PokemonScreen() {
    val pokemonViewModel: MainViewModel = viewModel()
    val viewState by pokemonViewModel.pokemonListsState
    val pokemonViewState by pokemonViewModel.singlePokemonState

    Column(
        modifier = Modifier
            .fillMaxSize()
            .padding(16.dp),
        verticalArrangement = Arrangement.Center,
        horizontalAlignment = Alignment.CenterHorizontally,
    ) {
        Box {
            when {
                pokemonViewState.loading -> {
                    CircularProgressIndicator(modifier = Modifier.align(Alignment.Center))
                }

                pokemonViewState.error != null -> {
                    Text("ERROR OCCURRED!", modifier = Modifier.align(Alignment.Center))
                }

                else -> {
                    pokemonViewState.pokemon?.let {
                        RandomizedPokemonScreen(
                            singlePokemon = it,
                            onRandomizeClick = { pokemonViewModel.randomizePokemon() })
                    }
                }
            }
        }
        Box {
            when {
                viewState.loading -> {
                    CircularProgressIndicator(modifier = Modifier.align(Alignment.Center))
                }

                viewState.error != null -> {
                    Text("ERROR OCCURRED!", modifier = Modifier.align(Alignment.Center))
                }

                else -> {
                    Column(
                        verticalArrangement = Arrangement.Center,
                        horizontalAlignment = Alignment.CenterHorizontally
                    ) {
                        Spacer(modifier = Modifier.height(16.dp))
                        PokemonListScreen(pokemonLists = viewState.pokemonLists, pokemonViewModel)
                    }
                }
            }
        }
    }
}
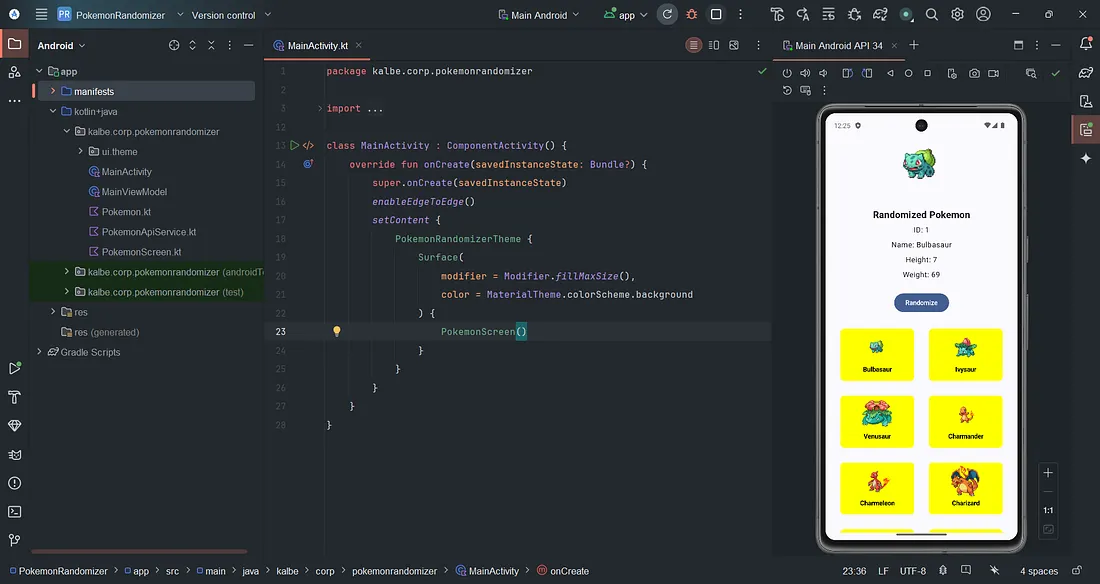
Now its done! We can now display the Pokémon's name, ID, weight, & height based on the response we get from the API calls. Lastly, for the final part of our code, we can go back to the MainActivity and place this code below to start our PokemonScreen on start up
class MainActivity : ComponentActivity() {
  override fun onCreate(savedInstanceState: Bundle?) {
      super.onCreate(savedInstanceState)
      enableEdgeToEdge()
      setContent {
          PokemonRandomizerTheme {
              Surface(
                  modifier = Modifier.fillMaxSize(),
                  color = MaterialTheme.colorScheme.background
              ) {
                  PokemonScreen()
              }
          }
      }
  }
}
If there were previously some default code that the Android Template created like "Greetings", you can just simply remove it and place the code above to replace the MainActivity class
Finally, now that our app is done, we can start to boot up an emulator and start our app up!
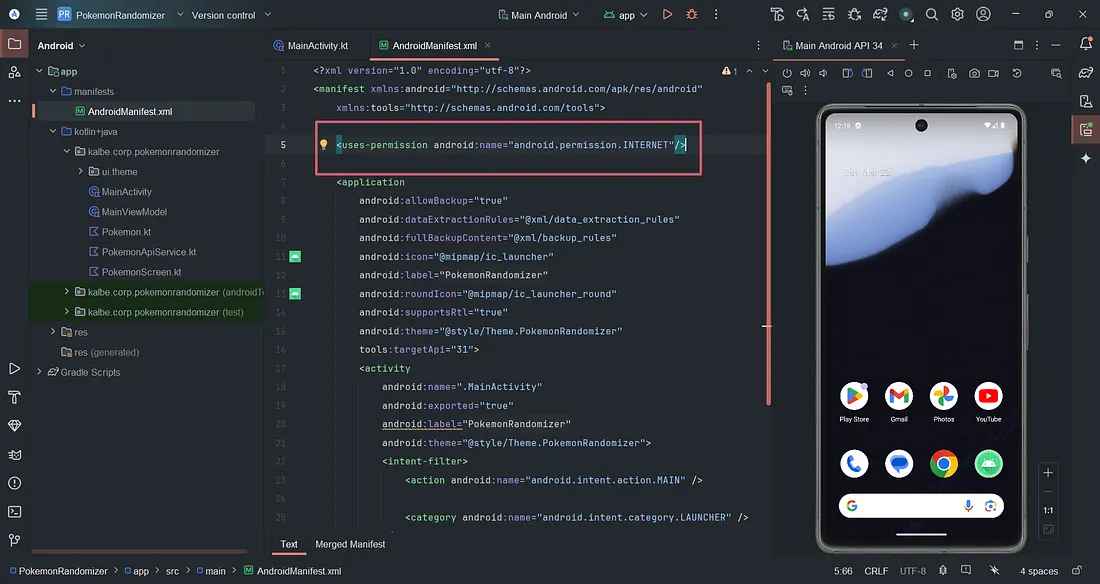
But wait, you may see that the app crashes once we start to boot it up. This is because we haven't let Android to have permission to access the Internet because the API calls requires us to access the Internet, we can fix this by going to the AndroidManifest.xml file located in the manifests folder
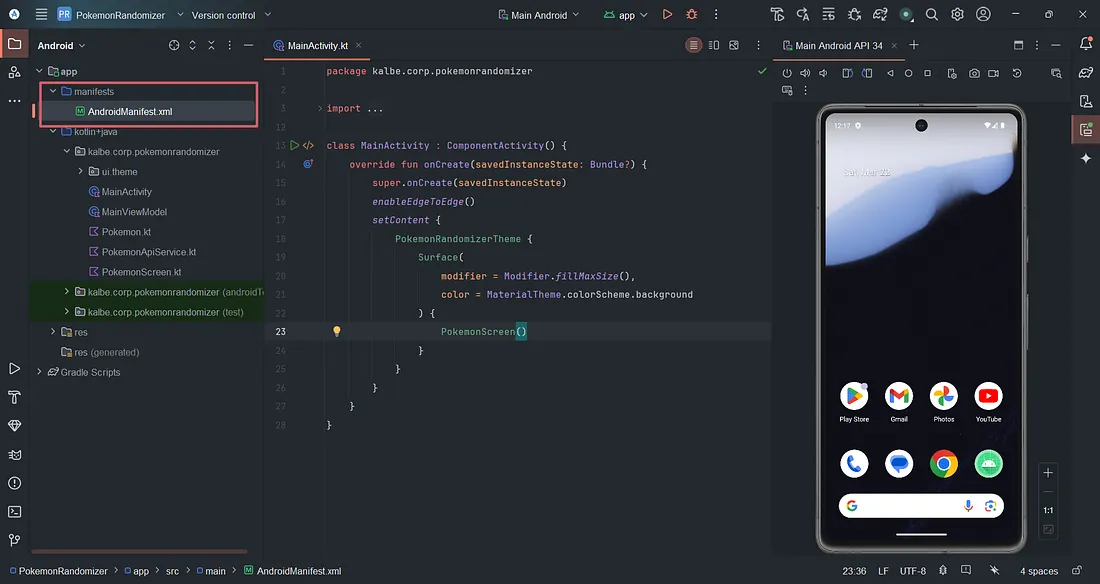
Now, add this code below to the xml file above the application
<uses-permission android:name="android.permission.INTERNET"/>
And now, Voilà! Now the app will definitely run in our emulator, boot it up to see if its up and running!
CONCLUSION
To summarized it all, in this tutorial, we have covered the essential Android Development skills by building a simple Pokémon Randomizer App using Kotlin, Jetpack Compose for UI design, API integration with Retrofit to fetch Pokémon data from the PokéAPI, state management with ViewModel, and handling JSON responses with Gson.
Some key takeaways that we've learned:
- UI Design with Jetpack Compose
- Fetching Data from PokéAPI using Retrofit
- Handling API Responses
- Using ViewModel for State Management
If you want to check out the full project, you can visit this GitHub for the complete code!
https://github.com/raf0411/pokemon-randomizer-app
I hope that you find this tutorial helpful and I strongly encourage you to modify and expand the app to the next level! Maybe by adding more data from the API such as its moves, or maybe adding a Pokemon detail page, etc. Keep on learning and Happy Coding! :)